
 116
116Analog electronic multimeters are useful instruments used to measure circuit parameters such as voltage, current, and resistance. And it is mainly composed of three parts: indicating part, measuring circuit and conversion device. Analog electronic multimeters differ from digital multimeters (DMM) in that the reading mode is derived from direct observation of the pointer position, rather than the digital reading on the digital displaying screen.
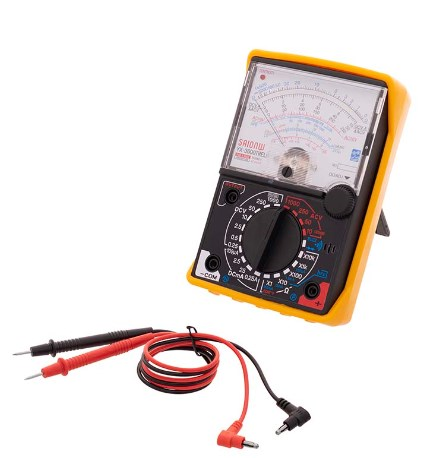
Image Source: Shiv Dial Sud & Sons
Analog electronic multimeter is a kind of multi-functional electrical measurement tool, which can measure DC current voltage, AC current voltage, resistance, audio level and transistor DC amplification and other physical quantities of the device. Analog electronic multimeter mainly applies a magnetoelectric measuring mechanism as the core, with the pointer to display the measured value. The head of an analog multimeter usually has four scales corresponding to resistance, voltage/current, and level readings.
Analog electronic multimeters usually have the following main features, as there are three different measurement ranges: voltage, current and resistance.
When measuring voltage, the red marker is usually inserted into the V/Ω hole, and the black marker is inserted into the COM hole.
When measuring the current, insert the red marker into the mA hole (less than 200mA) or 10A hole (more than 200mA), and then insert the black marker into the COM hole.
When measuring resistance, insert the red marker into the V/Ω hole and the black marker into the COM hole. And the pointer should be pointed near the center of the scale as far as possible to reduce the error.
Analog multimeters should be placed horizontally before operation and mechanically ensure that the pointer points to zero.
After learning what is an analog electronic multimeter as a traditional measuring tool displaying the measurement result by moving the pointer, the following sections are the basic steps and precautions for using an analog electronic multimeter correctly.
Before starting the measurement, it should be ensured that the multi-meter has been mechanically zeroed. This is usually done by turning the mechanical zeroing knob so that the pointer points to the zero position of the dial. If the pointer is not correctly aligned to zero, the battery in the watch may need to be replaced.
Next, select the appropriate range according to the expected value of the measured parameter. If you are unsure of the measured value, you should start with the highest range and gradually reduce the scope until you find the most appropriate reading range of the measurement.
Then, it goes to the process of pen connection. The red pen is usually connected to the positive potential of the circuit, while the black pen is connected to the negative potential or the common ground terminal. When measuring voltage, the red marker is connected to the high potential end of the circuit, and the black marker is connected to the low potential end. While measuring current, the multimeter should be connected in series in the circuit, with the red pen connected to the input end of the circuit and the black pen connected to the output end.
Before measuring resistance, you should disconnect the circuit and ensure that the resistance under the test is not affected by other circuit components. Short the pen and adjust the ohm zero adjustment knob so that the pointer refers to zero. Then touch the marker to both ends of the resistance to be measured and read the pointer's indication value.
When measuring voltage, set the selector switch to the appropriate DC voltage or AC voltage gear. After ensuring that the marker is properly connected, read the indicator value of the pointer. If you want an AC voltage measurement, select the AC voltage file of the conversion switch, and make sure the two testing pens are connected to both ends of the measured AC voltage without considering the polarity. As for the measurement of DC voltage, select the DC voltage file of the conversion switch, ensuring the red marker is connected to the positive end of the measured DC voltage, and the black marker is connected to the negative end of the measured voltage.
DC current measurement: Select the DC current range of the conversion switch, connect the multimeter to the measured circuit in series, connect the red pen to the current inflow direction, and connect the black pen to the current outflow direction.
After practical measurement, it is suggested to precisely read and record the resulting numbers. When reading the pointer position, it should be estimated to the nearest scale line to improve the accuracy of the measurement. And during the recording process, both the range and gear applied should be tracked for subsequent analysis and later comparison.
All the above are the basic guide of using an analog electronic multimeter. Please note that these steps are just based on the general operation of an analog electronic multimeter, which may vary slightly depending on different types of multimeter. Before using any electronic measuring tool, it is better to refer to the user manual provided by the manufacturer carefully to ensure proper and safe operation.
When using a multimeter, there are some tips and precautions for accident aversion and future maintenance. In addition, as analog electronic multimeter and digital multimeter are two common electronic measuring tools, a brief and straightforward comparison between them will be shown below for your consideration.
Firstly, the use of an analog electronic multimeter in a humid environment should be avoided unless it is a waterproof model specifically designed for this purpose.
Secondly, before current and voltage measurement, it is necessary to estimate the range of current and voltage to be measured. For instance, firstly set in a larger gear, and then adjust to a suitable gear to avoid excessive current burning the multimeter.
Last but not least, during the measuring process, the influence of the internal resistance of the multimeter should be taken into account. For example, in order to measure the voltage, connect the pen to the circuit under test. Then, the resistance in the multimeter also has a current flow, which has a certain impact on the measured value. When measuring the voltage at the same point, if different gears are used, the internal resistance of the multimeter is different, and thus the degree of influence is different.
After the measurement, the selection switch should be placed in the "OFF" gear or the highest gear of the alternating voltage, and the pen should be pulled out. Besides, the multimeter should be properly stored in a dry environment. If it will not be used for a long time, the battery should be removed to prevent battery leakage from corroding the instrument.
Analog electronic multimeter and digital multimeter are two common electronic measuring tools, which have significant differences in display mode, measurement accuracy and operation convenience, etc.
|
Analog electronic multimeter |
Digital multimeter |
|
|
Display mode |
Pointers and dials |
Digital screens |
|
Measurement accuracy |
Lower |
Higher |
|
Operation convenience |
Less convenient |
More convenient |
|
Function |
Basic functions |
Basic and more additional functions |
|
Stability and longevity |
Higher |
Lower |
|
Price |
Lower |
Higher |
|
Reading error |
Larger |
Smaller |
To sum up, while analog electronic multimeters may not be as advanced as digital multimeters in some respects, they still have advantages in terms of cost-effectiveness and stability. When choosing a multimeter, it is better to decide which type of equipment to use according to specific measurement needs and budget.
Analog electronic multimeter is a kind of electronic measuring tool which can be read by the pointer. It is widely used in circuit maintenance and debugging. When in use, the user needs to pay attention to select the correct measuring range and gear, correctly connect the marker, and perform the corresponding operation according to the measured circuit parameters. Through continuous practice and study, users can be more skilled in using analog electronic multimeters to measure various circuit parameters.
Disclaimer: The views and opinions expressed by individual authors or forum participants on this website do not represent the views and opinions of Chipsmall, nor do they represent Chipsmall's official policy.

share this blog to:
Chipsmall will provide you real-time product updates, limited-time deals.


Copyright © 2004-2024 Chipsmall.com All Rights Reserved.

Feedback
We appreciate your engagement with Chipsmall's products and services. Your opinion matters to us! Kindly take a moment to complete the form below. Your valuable feedback ensures that we consistently deliver the exceptional service you deserve. Thank you for being part of our journey towards excellence.

